My Music My Art

Saturday, June 24, 2017

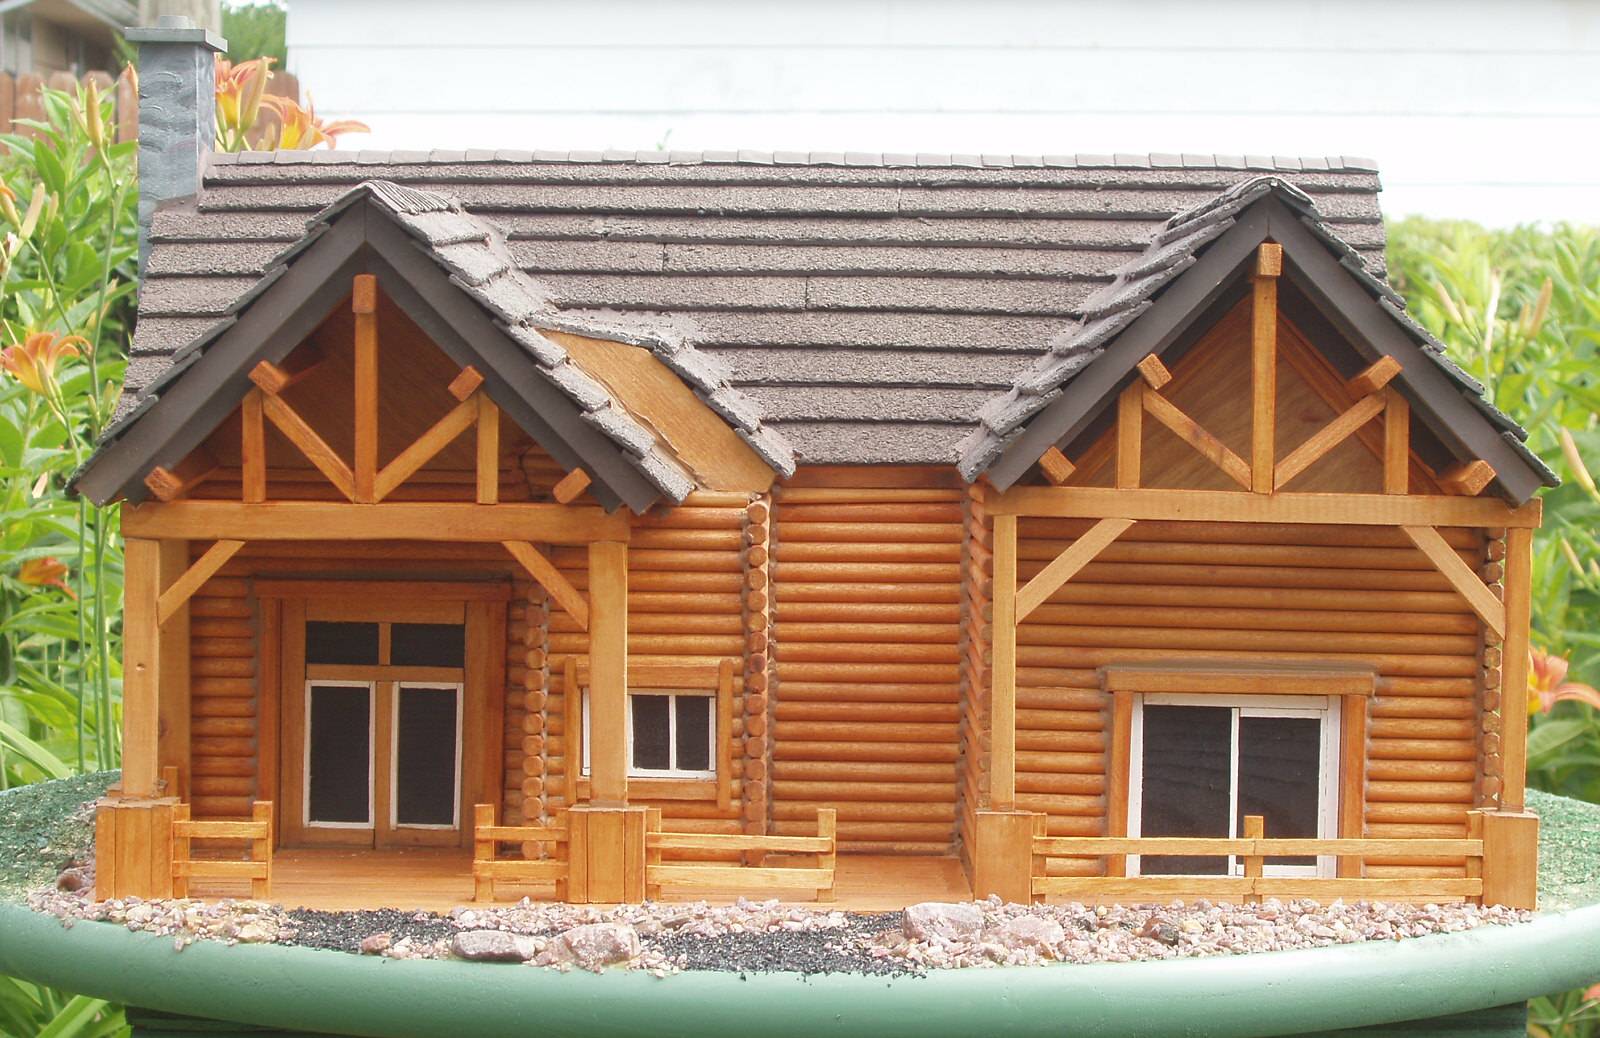
one awesome log home which can be converted to a bird house


I’ve often been asked why? Why bother building custom, elaborate bird-houses when birds could care less what they look like? Someone interested in acquiring a bird house could easily go to the store and buy one for a few bucks or if they were handy, making one is fairly easy, with the right tools. So, why spend all that labor and time building something that could be purchased for a few bucks?

There are several reasons why I do it: 1; It’s relaxing. 2; it’s challenging, 3; it’s creative, 4; it’s fun, 5; it’s an art-form/craft, 6; a great feel of accomplishment, 7; teaches you patience. 8; keeps me more focused. 9; it’s a great diversion…after painting my 300th painting; I needed a diversion from it and from my usual daily routine. 10; it involves a great ego trip after others see it and are blown away by it. I have one more which was an unexpected surprise while working on my recent project, 11; I lost two pant sizes. That’s true. Because I was so focused on my project, I had little time to think about eating or being hungry. When I got up each morning, I had my usual coffee and toast and got to my project. Mid morning time, I would take a short break for a bowl of cereal and then back to my project until lunch which came around 1:30P.M. For lunch I would have a half a sandwich with a bottle of light beer before getting back to my project. I would quit for the day around 5:30 and get ready for dinner. For dinner I would have a small serving of whatever the wife made and a glass of wine. Since I wasn’t very active physically, I didn’t need a lot of calories to burn off so I didn’t eat a lot nor was I hungry. What I ate was just healthy stuff.

The last thing on my mind is trying to sell these masterpieces which can take several weeks to complete. I don’t think that anyone would be interested in purchasing one especially for what I would have to charge for one. Yes there is a lot of intense detail in every one of my bird-houses which take hours and hours of my time. I also realize that birds could care less about any of that let alone know the difference in the quality of one. Sure I’d love to sell a few, but realistically it probably just isn’t going to happen. Therefore, I consider my projects as conversation pieces when completed. I’ve given several away to family and friends in the past to use as they see fit. Some have used them for birds while others keep them inside in plain view for their visitors. You would be surprised how well it breaks the ice of conversation without the usual small talk.

I built my first one, a simple one at that in just a few hours all painted and ready to hang, many, many years ago. Others liked what they saw and asked me to make them one. After making about a half a dozen, I got bored with them and began adding a little more detail to each new one. To say the least everyone loved them. After a while I had about twenty orders. Each one was different and all detailed. At first the detail was simply painted in and later they were made out of wood and glued in place after painting and cutting them out. The roofing was made from either painted gutter wrap or real shingles. I had left over shingles and just painted them a different color.

Some of the designs were duplicates of homes or vacation cottages or rental houses which I had been to. Sometimes I even add landscaping to the project as an extra wow factor. I use sand gravel and small stones I’ve picked up along my many travels. If I see something unusual, I’ll just pick some up and place it in a container for future use. Painted saw dust makes a good alternative for grass and attach it to the base using Mod Podge. Colored crab sand also has many uses for landscaping my miniatures. Since Mod Podge dries clear not only will it keep the sand on the base but it gives it a final finish.

I also have made bird feeders to attract more birds into my yard. I love to sit and watch them on daily basis and often see some unusual ones that I would not normally see around. Making bird-houses or feeders can be a lot of fun especially once they are completed and are being used. If you decide to make some, do it for the fun of it or for the art. Treat them the same way as you might a painting. I love to paint. I paint for myself for the enjoyment and not with the idea of selling them, even though I’ve sold several. Once you start doing something for money, it becomes a job and often times the enjoyment is sucked right out.

My recent project started out with the idea of making a bird house but ended up a craft project which can be easily converted into a bird house by simply drilling a few holes in strategic areas where I had built cubicles for nests. The project turned into a log home which was made mostly of cedar. The decking on the roof was from a piece of ¼” scrap birch plywood I had on hand. The roof was made from real asphalt shingles, cut and adhered to the deck using roof cement.  The logs were 3/16” dowels I picked up at a local home improvement store and stained with an exterior, natural cedar stain, then glued individually using an exterior construction adhesive. Everything else was cut from stock cedar, stained to match the logs, and then glued into place using exterior, waterproof wood glue. The grass was made from cedar saw dust glued and then painted and sealed. The stone landscaping was from various collections I gathered during my travels. They are from lakes and rivers. They too were glued in place and sealed so that the sandy parts would not come loose. The entire project from start to finish took four weeks. Now I just have to figure out where and how I’m going to display it.

here I am right after completing this cool little gem

The house is mostly made from cedar. The logs are from dowels, individually cut, glued and stained. The posts and supports were cut from a piece of stock cedar. The doors and windows are trimmed out. The roof is made from real roofing left over. I painted it using a special paint for roofing.

I used black sand for the path to the doors and little red stones from Wisconsin for landscaping

I used oil paints to create the stone look on the chimney. If I wanted to make this into a bird house all I have to do is drill a hole just left of the windows located on the left side of the chimney. There is a large enough cubicle in there for a bird nest.

I used cedar saw dust and added color to it for grass. Both the left and right side of this wall have cubicles in side for bird nests, should I want.
what's a cool log house without a deck,railings and some sort of cover for shade or area for barbecuing. Both the front and back decking and posts/railings were cut painstakingly with a utility knife and a small hand saw from cedar.


The search for a perfect alternative birch vihta/sauna whisk for my area


The last time I had the opportunity to use a real birch made vihta was back in the late sixties; that was in northern Canada. I am a first generation Finn and the sauna and vihta have always played an important role in my life. Whenever and wherever we went for a sauna, vihtas were always on hand. The folks with the sauna always provided their guests with them. I never had the opportunity to learn about the making or the handling of them until recently.

As a teenager living in the Chicago land area, my dad had built a sauna but the sauna whisk was never in the picture. The traditional sauna whisk was made of birch which is pretty much non existent in this area except for a few which might be found in forest preserves and they are protected. There was no thought regarding an alternative to birch until I had a real urge to find one. There was something about the use of a sauna whisk in the sauna which was on my mind for years but never really came into play until I built my own sauna.


I had a big urge to experience the vihta again after several decades. The purpose of it is to massage the muscles and joints by beating one self with the vihta. The soft leaves are perfect for a great massage while in the sauna. Birch leaves give off a wonderful odor and the stained water after dipping it in a bucket of water can be used to wash your hair. It has some wonderful properties in there which makes your hair glisten with nutrients. I even drove 5 hours north to an area that had birch trees so that I could harvest a few for my sauna. But alas they were filled with worms and by the time I got home a few days later and was ready to use them, the leaves had fallen off.

I got on the internet and did a bit of research and found a few alternatives to birch vihtas. Many of them just weren’t available locally and what was were protected. If you got caught, there would be a stiff fine and jail time involved, so I decided not to pursue that avenue. I decided to try various other trees and bushes that were in my back yard to see whether they might be a good candidate. I have lilac bushes, cotton wood, elm, apple, cherry, juniper, maple and mulberry trees.

The elm, apple and cherry trees were all infested with worms and the leaves were almost eaten with big holes in them. The branch configurations weren’t quite right either for what I wanted. The lilac bushes were beautiful with large dark green leaves and perfect stems/branches however, although they added a wonderful odor in my sauna, they fell apart almost immediately. The juniper boughs are similar to cedar which also gave me a wonderful aroma to my sauna but I ended up with juniper needles everywhere. My maple trees had worms on them but I was able to harvest enough for one small vihta. The odor was magnificent but the leaves fell off very quickly. I think that the leaves weren’t quite mature enough during harvest as they were still light in color. They need to be dark green. I haven’t given up on maple quite yet and will give them another try in the near future, provided the leaves haven’t been eaten by worms.

The cotton wood leaves could easily be mistaken for birch from a distance. They have nice dark color to them and have big leaves about the size of a birch leaf. The stem is a bit longer and I wonder how they will hold out. My tree is too tall to get to the leaves but there are several not too far from me which I will have to try soon as well. I harvested some mulberry branches this morning. While bunching them together, I found a tick on one of the leaves. Fortunately I discovered it in time and cut the leaf off making sure not to make contact with the tick. Ticks will not jump on you; they will only get on you by contact. I finished making my vihta and stuck them into water like a bouquet of flowers and just got done using them. I dunked the leaves into warm water just before using them and to my amazement, the leaves held together. They did a wonderful job acting as a vihta although they did not give off any odor. I feel so relaxed after a great massage with the vihta. Mulberry branches will definitely be on my list.

Keep in mind that these sauna whisks/vihtas can only be used once. I thought about ordering a few through the internet but the shipping from Europe or Finland is just not worth it for one time use. More to come as I try making vihtas from different sources.

Thursday, February 2, 2017

Can I Use Canvas Boards with Wet On Wet Technique?


I've watched all 403 Bob Ross’s “Joy of Painting” some more times than others and he often says not to use canvas boards for this technique. His reason was that because the middle of the board is cardboard which sucks up the medium used and you end up with a dry board. At the time it may have been the case as the panels were only single primed. Today, however, I can purchase triple primed canvas boards even at box stores like Walmart or other stores carrying paint/craft supplies. The drawback still is that the center is cardboard and like with pre-stretched canvasses, quality varies even from one board to another.

There are many reasons why most of us might want to use canvas boards. The obvious one is they’re cheaper. Another is that you don’t have to put it in a custom frame costing you plenty. I use both depending on what my purpose is. My goal is to enjoy painting but keeping my costs down. I paint every day. Sometimes I’ll do one and other times I will do two. In a years time this thing with painting could cost me a fortune.

I first began using canvas boards for painting portraits. I wasn’t sure how liquid white would get absorbed into the board and often mixed liquid white into the paint to thin it rather than onto the canvas board itself. Doing portraits need a soft oil paint and rather than going out and get ripped off by purchasing more paints, I decided to use my thick Winton oils by Windsor and Newton and just thin them down. Winton oils worked well for me doing the wet on wet technique so why not on portrait. My goal is to save money when ever I can. I’m tired of getting ripped off by paint supply stores and by manufacturers. When I discovered how well this worked, I decided to take it up a notch and try painting the entire board with liquid white and liquid clear.

The first thing I did was to take a 9"X12" canvas board which was only double primed, covered 1/3 of it with liquid white. The middle section, I covered with diluted soft white thinking that it may be a good substitute for liquid white should I run out. The bottom 1/3 I covered with liquid clear. I just let it sit and see what happens. They were all still wet and slick after 24 hours. Just to see if they would last another 12 hours, I thought that I'd let them sit over night. 12 hours later they were all still wet and slick, ready to go. So 36 hours later the canvas board still had not sucked up either of the liquid white or liquid clear.

I have now used various size canvas boards up to 16”x 20”, the largest, I found and covered them with liquid white and then painted a landscape. Most of them were completed in a day. My problem was that the larger size boards began to warp, but then as I recall I had the same problem using acrylics earlier in my learning to paint period. The way I solved that problem was to secure all four sides of the board using tacks or screws….no, not through the board! I used a piece of luan plywood slightly larger than the largest canvas board I could find and then screwed small screws into the luan along the sides of the canvas board so that the head of the screw would secure the top, bottom and sides. I used two on all sides giving me a total of eight screws holding the board well in place and keeping it from warping.

I like doing many of my paintings using colored gesso and mix my own colors for the background thus saving on waste. Let’s face it folks, there is a lot of wasted oil paints using this technique costing you and me plenty. By doing most of my backgrounds in acrylic gessoes, I save a lot of oil paint. Acrylic gessoes also add texture. I discovered that for some reason the liquid clear disappears over Gesso after a few minutes. Two coats are needed over acrylic Gessoes. I apply the first coat over the entire board and let it sit for about 5 to 10 minutes. If the board looks and feels dry, I'll go ahead and add a second coat. This usually does the trick and allows me to finish my painting with out problems.

Liquid white and liquid clear work better on a fresh white canvas board right out of the package. Once more gesso is added to the board whether black or other colors, liquid clear seems to get sucked in while liquid white does not. So do what I do, add a second coat of liquid clear if need be and go about your painting.


Here are some paintings I did on canvas board:

a wet on wet technique on canvas board

another wet on wet using canvas board

using acrylic gessoes for backgrounds saves money

canvas board painting using liquid clear and liquid white

For more art stuff visit me here:Markku-artist